
When a coding machine print is not clear, the problem is not always the printer itself. On a real packaging line, unclear date codes, batch numbers, barcodes, QR codes, and lot marks can come from the printhead, ink, ribbon, substrate, conveyor movement, sensor timing, product spacing, or the way the coder is installed.
A faint or blurred code may look like a small quality issue, but it can quickly affect traceability, retailer acceptance, inspection results, and production efficiency. The goal is not just to make the next print look better. The goal is to find why the code became unclear and prevent the same issue from returning during the next shift, product changeover, or high-speed run.
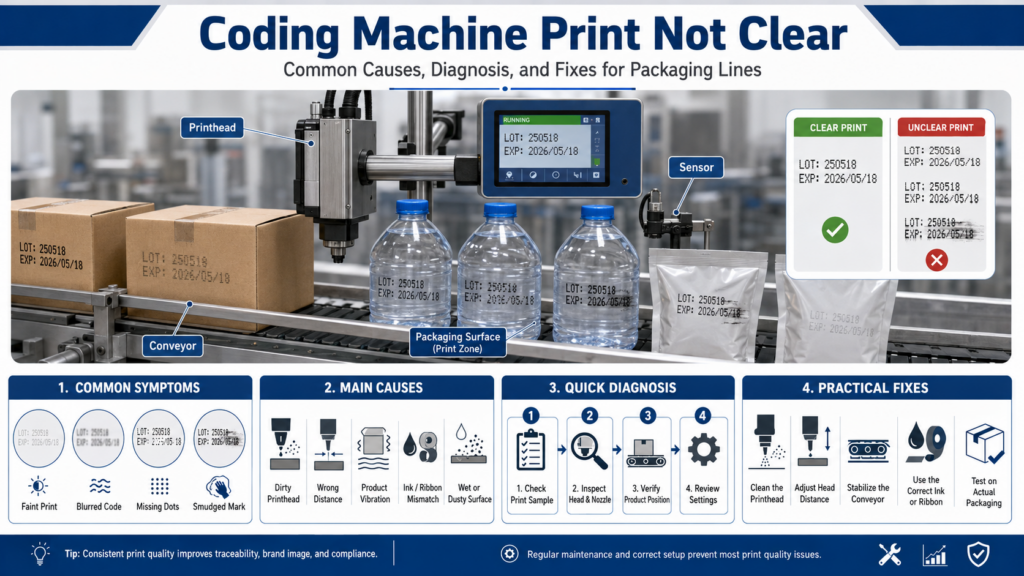
This guide explains the common symptoms, likely causes, diagnosis steps, and practical fixes for unclear coding machine prints across common packaging applications, including bottles, cartons, pouches, films, labels, trays, and corrugated cases.
What Does “Coding Machine Print Not Clear” Usually Mean?
In packaging operations, “not clear” can describe several different print defects. Before adjusting settings, first identify the exact symptom.
Common unclear print symptoms include:
- Faint or weak characters
- Blurred text
- Missing dots or broken characters
- Smudged codes
- Streaks or lines through the print
- Code printed in the wrong position
- Uneven print darkness
- Distorted barcode or QR code
- Ink spreading on the surface
- Print rubbing off after handling
- Intermittent good and bad prints
- Clear print at low speed but poor print at normal speed
Each symptom points to a different group of causes. For example, a faint thermal transfer code on flexible film may be related to ribbon, temperature, or printhead pressure. A blurred inkjet code on a bottle may be related to distance, surface moisture, vibration, or incorrect ink drying behavior.
Quick Troubleshooting Table
| Symptom | Likely Causes | What to Check First | Practical Fix |
|---|---|---|---|
| Faint print | Low ink transfer, low temperature, weak cartridge, wrong ribbon, low contrast substrate | Ink level, ribbon type, darkness setting, printhead pressure | Adjust print settings, replace cartridge/ribbon, test higher-contrast code area |
| Blurred print | Excess distance, product movement, wet surface, wrong ink, excessive heat, speed mismatch | Printhead distance, conveyor stability, product surface, line speed | Reposition printhead, stabilize product, adjust speed or print delay |
| Missing dots or broken characters | Clogged nozzle, dirty printhead, damaged printhead element, ribbon wrinkle | Printhead/nozzle condition, test print pattern | Clean printhead, flush nozzle if applicable, replace cartridge or printhead if worn |
| Smudged code | Ink not dry, wrong ink/substrate match, film movement, too much heat on TTO | Drying time, substrate type, contact after printing | Use suitable ink/ribbon, add drying distance, reduce heat, improve product handling |
| Code shifts position | Sensor timing issue, product spacing variation, conveyor speed changes | Sensor position, encoder signal, trigger delay | Recalibrate sensor, adjust print delay, inspect encoder and product guides |
| Intermittent unclear print | Vibration, unstable product position, inconsistent substrate, air drafts, loose bracket | Mounting, guides, rails, product presentation | Tighten mounts, stabilize conveyor, improve side guides |
| Barcode not scanning | Low contrast, distortion, missing modules, quiet-zone issue, poor resolution | Barcode size, contrast, print density, verification result | Increase size, improve contrast, clean printhead, verify with scanner |
The Most Common Causes of Unclear Coding Machine Print
1. Dirty Printhead or Clogged Nozzle
A dirty printhead is one of the most common causes of unclear coding. Ink mist, dust, paper fibers, adhesive residue, product splash, and dried ink can gradually build up around the print area.
On continuous inkjet printers, nozzle contamination can cause missing drops, distorted characters, or unstable print. On thermal inkjet systems, a dirty cartridge nozzle plate can create missing lines or weak areas. On thermal transfer overprinters, dirt on the printhead can cause vertical lines, missing sections, or uneven transfer.
Typical signs include:
- Some characters are complete while others are broken
- The same vertical line is missing across multiple prints
- Print quality improves temporarily after cleaning
- The first prints after startup are worse than later prints
- The code becomes worse over the shift
Practical fixes:
- Clean the printhead using the method recommended for that printer type.
- Use approved cleaning fluid, swabs, or lint-free cloths.
- Avoid scraping the nozzle or printhead surface.
- Check for nearby dust sources, product splash, or ink mist.
- Add cleaning checks to shift startup and changeover routines.
- Replace the cartridge or printhead if cleaning no longer restores quality.
Do not over-clean with aggressive tools. A damaged nozzle plate or scratched printhead can create a permanent print defect.
2. Incorrect Printhead-to-Product Distance
Distance matters, especially for non-contact inkjet coders. If the printhead is too far from the product, drops may spread, drift, or land inaccurately. If it is too close, the printhead may be exposed to product impact, splashback, or vibration.
This is common on:
- Bottles with inconsistent orientation
- Pouches that move or flex
- Corrugated cases with uneven surfaces
- Trays with raised edges
- Products running without stable side guides
Typical signs include:
- Characters look tall, stretched, or fuzzy
- Print is clear on some products but blurred on others
- Print quality changes when product position changes
- Ink mist appears around the print area
- Printhead face gets dirty quickly
Practical fixes:
- Set the printhead at the recommended distance for the coder.
- Use product guides to keep the print surface consistent.
- Check whether bottles, cartons, or cases are wobbling.
- Avoid mounting the printhead where products can strike it.
- For corrugated case coding, account for flap height variation and box bulging.
- Recheck distance after format changes or conveyor maintenance.
A small distance error may not show during slow testing, but it can become obvious at production speed.
3. Product Movement, Conveyor Vibration, or Poor Line Stability
A coding machine can only print clearly if the product is presented consistently. Even a well-maintained printer may produce unclear marks if the product shifts, bounces, rotates, or changes speed during printing.
Common examples:
- A round bottle rotates slightly as it passes the printhead.
- A pouch flutters under an air blast or near a sealing jaw.
- A carton bounces over conveyor transfers.
- A corrugated case leans because side guides are too loose.
- A label web speed is unstable during acceleration.
Typical signs include:
- Print is slanted, stretched, compressed, or wavy
- The same printer prints well offline but poorly on the line
- Defects increase at higher conveyor speed
- Print position changes from product to product
- Barcode grades drop during full-speed production
Practical fixes:
- Tighten and align printhead mounting brackets.
- Check conveyor belts, transfers, rails, and side guides.
- Stabilize round containers before printing.
- Use an encoder when conveyor speed varies.
- Keep the print zone away from unstable transfer points.
- Verify that the sensor sees the product consistently.
- Inspect for loose brackets after washdown, cleaning, or maintenance.
For packaging lines, print quality is partly a mechanical control problem. Stable product handling is often as important as printer settings.
4. Wrong Ink, Solvent, or Ribbon for the Substrate
A clear code depends on compatibility between the marking method and the packaging material. Ink that works well on paperboard may not adhere well to glossy plastic. A ribbon that prints clearly on a matte label may smear on a slick flexible film.
Substrate-related problems are common on:
- PET bottles
- HDPE containers
- Aluminum foil
- Glossy cartons
- Flexible films
- Laminated pouches
- Shrink sleeves
- Corrugated boxes
- Coated labels
Typical signs include:
- Code looks clear at first but rubs off later
- Ink beads up on the surface
- Print spreads into the substrate
- Code smears after contact with belts, guides, or hands
- TTO print is weak even after temperature adjustment
- Barcode contrast is too low
Practical fixes:
- Confirm the ink or ribbon grade is suitable for the substrate.
- Test adhesion after the actual drying or cooling time.
- Check whether the surface has oil, condensation, powder, or dust.
- Avoid printing on curved, wet, wrinkled, or highly textured areas when possible.
- For TTO, match ribbon type to the film or label material.
- For TIJ and CIJ, verify ink dry time and adhesion under real line conditions.
- For laser coding, check whether the substrate is designed or coated for laser marking.
Do not evaluate print quality only at the printer. Check the code after downstream handling, packing, and typical storage conditions.
5. Incorrect Print Settings
Print settings can make a good system produce poor codes. Operators may increase darkness, pressure, or ink output to compensate for a deeper issue, but excessive adjustment can create new problems.
Settings to check include:
- Print speed
- Print delay
- Character height
- Stroke width
- Dot size
- Ink pressure or viscosity control
- Darkness or energy setting
- TTO temperature
- TTO printhead pressure
- Ribbon tension
- Barcode size and resolution
- Encoder settings
- Sensor trigger delay
Typical signs include:
- Code is too dark and smears
- Barcode edges bleed
- Print is compressed or stretched
- Text is too small for the surface
- Print is clear at one speed but poor at another
- TTO ribbon breaks or wrinkles
- QR code fails scanning despite being visible
Practical fixes:
- Return to a known good recipe or saved job setting.
- Compare the current setup with the last successful production run.
- Adjust one variable at a time.
- Use a test pattern before changing production artwork.
- For barcodes and QR codes, verify print size, contrast, and quiet zones.
- Record approved settings by product, substrate, and line speed.
Avoid solving every unclear print problem by increasing print darkness. Too much energy, ink, or heat can cause bleeding, smearing, ribbon damage, or faster printhead wear.
6. Surface Moisture, Condensation, Dust, or Product Contamination
Packaging surfaces are not always clean and dry. Moisture, oil, powder, dust, frost, or product residue can prevent a clear code.
This is especially common in:
- Beverage filling lines
- Dairy packaging
- Frozen food packaging
- Powder products
- Wet cleaning environments
- Cosmetic containers
- Chemical containers
- High-humidity production rooms
Typical signs include:
- Ink refuses to wet the surface evenly
- Print fades or breaks in patches
- Code smears with light contact
- Defects appear after washdown or temperature change
- Print quality varies by batch or room condition
Practical fixes:
- Inspect the print area before coding.
- Add an air knife or drying step if safe and suitable.
- Avoid printing near liquid splash zones.
- Move the print location to a drier area of the package.
- Control condensation before products reach the coder.
- Keep dust and powder away from the printhead.
- Confirm cleaning chemicals are not leaving residue on the package.
If the packaging surface changes during the day, the coder may seem inconsistent even when the printer is working normally.
7. Sensor or Encoder Problems
A coding machine needs the correct trigger signal. If the sensor is poorly positioned or the encoder signal is unstable, the print may be unclear, misplaced, stretched, or repeated incorrectly.
Typical signs include:
- Code starts too early or too late
- Print appears in different positions
- Some products are missed
- Barcode is stretched at speed changes
- Print is clear during manual test but poor during automatic operation
Practical fixes:
- Clean the sensor lens.
- Check sensor alignment and distance.
- Confirm the sensor detects the correct product edge.
- Avoid detecting transparent film, glossy reflections, or unstable surfaces without proper sensor selection.
- Check encoder wheel contact and slippage.
- Inspect cables and connectors.
- Recalibrate trigger delay after moving the printhead or sensor.
On variable-speed packaging lines, an encoder is often necessary for consistent code length and position.
8. Worn Printhead, Damaged Cartridge, or Aging Components
If cleaning and setup checks do not restore clarity, the printhead or cartridge may be worn or damaged. Printheads are consumable components in many coding systems.
Typical signs include:
- The same dots or lines are always missing
- Cleaning no longer improves print quality
- TTO print has permanent vertical white lines
- TIJ cartridge prints weakly after repeated cleaning
- CIJ print remains unstable after nozzle maintenance
- Laser code quality drops because of dirty or damaged optics
Practical fixes:
- Run the printer’s diagnostic or test pattern.
- Compare output with a new cartridge, ribbon, or printhead if available.
- Inspect the printhead surface for damage.
- Replace worn components according to the maintenance schedule.
- Check whether operators are using correct cleaning methods.
- Protect the printhead from impact and product collision.
Repeatedly increasing settings to compensate for a worn printhead usually increases downtime and may damage consumables faster.
Troubleshooting by Coding Technology
Continuous Inkjet Printer
Continuous inkjet printers are common for date codes, lot numbers, and variable data on bottles, cans, pouches, tubes, cables, and many other products.
Common causes of unclear CIJ print include:
- Dirty printhead
- Clogged nozzle
- Incorrect printhead distance
- Ink viscosity issue
- Wrong ink for the substrate
- Excessive vibration
- Poor product guiding
- Surface moisture
- Incorrect character height or stroke setting
Diagnosis steps:
- Print a sample while the line is stopped if possible.
- Check whether the code is clear when the product is stable.
- Inspect the printhead and nozzle area.
- Confirm ink and makeup levels.
- Check the printhead distance and angle.
- Verify sensor timing and encoder signal.
- Run at slow speed, then normal speed, and compare results.
Possible fixes:
- Clean or flush the printhead according to the manual.
- Reposition the printhead.
- Improve product guides.
- Confirm ink compatibility.
- Check viscosity or fluid system alerts.
- Restore the approved job settings.
- Reduce vibration around the print zone.
Thermal Inkjet Printer
Thermal inkjet printers are often used for cartons, sleeves, labels, porous and semi-porous substrates, and some high-resolution text or barcode applications.
Common causes of unclear TIJ print include:
- Dirty cartridge nozzle plate
- Low or drying cartridge
- Incorrect distance to product
- Wrong ink type
- Poor substrate absorption
- Dust on carton surface
- Product moving during print
- Incorrect resolution or speed setting
Diagnosis steps:
- Run a nozzle test or purge.
- Wipe the cartridge nozzle plate with approved materials.
- Check print quality with a new cartridge.
- Confirm the throw distance.
- Test on the actual packaging material.
- Check whether the product surface is dusty, wet, or coated.
Possible fixes:
- Clean or replace the cartridge.
- Use the correct ink formulation.
- Adjust the printhead distance.
- Improve carton or product guiding.
- Select a more suitable print area.
- Use proper cartridge storage and capping procedures.
Thermal Transfer Overprinter
Thermal transfer overprinters are widely used on flexible packaging films, labels, flow wrappers, vertical form-fill-seal machines, and pouch lines.
Common causes of unclear TTO print include:
- Incorrect heat or darkness setting
- Wrong ribbon for the film
- Low or uneven printhead pressure
- Worn printhead elements
- Ribbon wrinkle
- Incorrect ribbon tension
- Dirty printhead
- Film movement during printing
- Incorrect bracket setup on packaging machine
Diagnosis steps:
- Check whether the defect is faint, blurred, broken, or smeared.
- Inspect the ribbon path and tension.
- Clean the printhead.
- Confirm the ribbon is compatible with the film.
- Check temperature, speed, and pressure settings.
- Inspect printhead wear using a test pattern.
- Confirm the film is stable during the print cycle.
Possible fixes:
- Adjust heat in small increments.
- Reduce excessive heat if print bleeds or smears.
- Adjust printhead pressure evenly.
- Reload the ribbon correctly.
- Replace wrinkled, damaged, or incompatible ribbon.
- Replace worn printhead elements.
- Stabilize film tension and registration.
Laser Coder
Laser coders are used for permanent marks on cartons, labels, bottles, cans, films, foils, and coated materials. A laser code may look unclear when the material response is weak, the lens is dirty, or the marking setup is not matched to the surface.
Common causes of unclear laser coding include:
- Dirty lens
- Incorrect focus distance
- Wrong marking speed or power
- Substrate not suitable for strong contrast
- Product movement
- Poor extraction of fumes or dust
- Incorrect code size
- Marking on curved or uneven areas
Diagnosis steps:
- Inspect lens cleanliness using approved procedures.
- Confirm focus distance and mounting position.
- Test power and speed settings on the actual substrate.
- Check product stability during marking.
- Confirm extraction system performance.
- Compare code quality across different package batches.
Possible fixes:
- Clean optics only according to the manufacturer’s instructions.
- Adjust focus and working distance.
- Optimize laser power, frequency, and marking speed.
- Move the code to a flatter or more reactive area.
- Improve product handling.
- Confirm the substrate is appropriate for laser coding.
Laser systems require strict safety procedures. Do not open guards, adjust optics, or service the system unless trained and authorized.
Step-by-Step Diagnosis Workflow
Step 1: Capture the Defect
Keep several samples of the unclear print. Mark the time, line speed, product, operator, and packaging material batch.
Useful questions:
- Is every print unclear or only some?
- Does the defect appear after startup?
- Did it begin after a product changeover?
- Did it begin after cleaning or maintenance?
- Is the problem worse at high speed?
- Is the defect always in the same part of the code?
A saved sample prevents guesswork and helps identify repeating patterns.
Step 2: Separate Printer Problems from Line Problems
Run a controlled print test if your equipment allows it.
If the printer produces a clear sample when the product is stable, the issue may be related to conveyor movement, distance, sensor timing, or substrate presentation.
If the print is still unclear during a static or controlled test, focus on the printhead, ink, ribbon, cartridge, settings, or printer maintenance.
Step 3: Check the Printhead Area
Inspect the printhead, nozzle, cartridge, ribbon path, or lens depending on the technology.
Look for:
- Dried ink
- Dust
- Adhesive residue
- Film particles
- Product splash
- Scratches
- Damaged nozzle plate
- Ribbon wrinkle
- Missing printhead dots
Clean only with approved materials. Incorrect cleaning can damage precision parts.
Step 4: Confirm Distance, Angle, and Mounting
A printhead that is slightly moved during cleaning, washdown, or changeover can cause unclear codes.
Check:
- Distance from printhead to product
- Printhead angle
- Bracket tightness
- Product guides
- Conveyor vibration
- Sensor position
- Encoder contact
Do not rely only on visual judgment. Use a gauge or setup reference where possible.
Step 5: Review Job Settings
Compare the current job with the approved settings for that product.
Check:
- Correct product recipe
- Character height
- Print speed
- Print delay
- Barcode size
- Darkness or heat
- Pressure
- Resolution
- Encoder mode
- Sensor trigger settings
If multiple operators adjust settings independently, create a controlled parameter sheet for each product and substrate.
Step 6: Test the Actual Packaging Material
Print quality can change when the packaging material changes, even if the printer setup is the same.
Test:
- New film roll
- New carton supplier
- Glossy versus matte surface
- Different bottle color
- New label coating
- Wet or cold package surface
- Dusty corrugated case
A code that looks perfect on a test card may fail on the real packaging material.
Step 7: Verify Downstream Handling
A code may be clear at the printhead but become unclear later.
Check whether the printed area contacts:
- Conveyor belts
- Guide rails
- Accumulation tables
- Carton erectors
- Case packers
- Shrink tunnels
- Label applicators
- Operator gloves
- Secondary packaging
If the mark smears downstream, the solution may be ink selection, drying time, code location, or product handling—not the printer head alone.
Packaging Line Examples
Example 1: Blurred Date Code on PET Bottles
A beverage line prints date codes on PET bottles. The print looks clear at low speed but blurred at full speed.
Likely causes:
- Bottles rotate slightly during printing
- Printhead distance changes as bottles wobble
- Surface has condensation
- Conveyor speed is not matched to print settings
Practical actions:
- Improve bottle guiding before the printhead
- Move the print location to a more stable area
- Add drying or air control if condensation is present
- Check encoder and speed settings
- Reconfirm printhead distance
Example 2: Faint Code on Flexible Film
A vertical form-fill-seal line uses a TTO printer on flexible film. The code is readable but too light.
Likely causes:
- Heat setting too low
- Ribbon does not match film
- Printhead pressure uneven
- Film tension unstable
- Printhead elements worn
Practical actions:
- Clean the printhead
- Increase heat gradually
- Check ribbon grade
- Adjust pressure evenly
- Inspect ribbon path and tension
- Test another film or ribbon combination
Example 3: Broken Characters on Corrugated Cases
A case coding printer marks batch information on corrugated boxes. Some characters have missing dots.
Likely causes:
- Dust from corrugated material
- Nozzle contamination
- Box surface too uneven
- Printhead too close or too far
- Box height variation
Practical actions:
- Clean the printhead
- Improve box guiding
- Check throw distance
- Reduce dust near the print zone
- Select a flatter print panel
- Confirm case material consistency
Example 4: QR Code Visible but Not Scanning
A carton line prints a QR code that looks acceptable to the eye but fails scanning.
Likely causes:
- Low contrast
- Incorrect QR code size
- Missing quiet zone
- Distorted modules due to speed variation
- Dirty printhead
- Incorrect resolution setting
Practical actions:
- Verify QR code size and quiet zone
- Clean the printhead
- Improve contrast between code and background
- Use barcode verification instead of visual inspection only
- Confirm speed and encoder settings
- Avoid printing over graphics, seams, or folds
Preventive Maintenance Checklist
Use this checklist to reduce recurring unclear print problems.
Daily Checks
- Inspect printhead or nozzle area
- Clean according to approved procedure
- Confirm correct job is loaded
- Check ink, solvent, cartridge, ribbon, or consumable level
- Verify sensor position
- Print and keep a startup sample
- Confirm code position and readability
Changeover Checks
- Confirm product recipe
- Check printhead distance
- Adjust guides and rails
- Confirm sensor trigger point
- Test on actual packaging material
- Verify barcode or QR code scanning
- Record any setting changes
Weekly Checks
- Inspect mounting brackets
- Check conveyor vibration near the coder
- Inspect cables and connectors
- Review rejected codes or quality complaints
- Clean surrounding dust and debris
- Check encoder wheel condition if used
Long-Term Checks
- Track printhead life
- Review consumable compatibility
- Standardize approved inks and ribbons
- Train operators on cleaning methods
- Create troubleshooting records by product and substrate
- Audit code quality after line modifications
When to Stop Adjusting and Call Maintenance
Operators can solve many unclear print issues with cleaning, setup checks, and correct job selection. However, some conditions require maintenance or qualified technical support.
Escalate the issue when:
- The same print defect returns immediately after cleaning
- A test pattern shows permanent missing dots
- The printhead is scratched or physically damaged
- The printer reports fluid, pressure, charge, or electronics errors
- Laser optics or safety guards are involved
- Ribbon breaks repeatedly after correct loading
- Print quality changes randomly without line changes
- Barcode verification fails despite setup correction
Continuing production with unclear codes can create larger traceability and rework problems. If the code is required for compliance or customer acceptance, stop and verify before releasing product.
How to Prevent Unclear Codes During New Product Setup
Unclear print often appears when a new product, new film, new carton, or new line speed is introduced. Build code testing into the setup process.
Before approving a new product run, check:
- Print location
- Code size
- Contrast
- Drying or cooling time
- Smudge resistance
- Barcode or QR code scan result
- Print quality at full speed
- Performance after downstream handling
- Operator access for cleaning
- Risk of product collision with printhead
For packaging lines with frequent changeovers, save approved print recipes and keep a physical or digital print sample for each product.
FAQ
Why is my coding machine print not clear?
The most common reasons are a dirty printhead, clogged nozzle, incorrect printhead distance, unstable product movement, unsuitable ink or ribbon, poor substrate condition, incorrect settings, or sensor timing problems. Start by identifying whether the print is faint, blurred, broken, smudged, or misplaced.
Why does the code look clear at low speed but blurry at production speed?
This usually points to line-related issues such as product vibration, conveyor speed variation, unstable guides, poor encoder signal, or incorrect speed settings. The printer may be capable of clear printing, but the product is not being presented consistently at full speed.
Can the wrong ink make coding unclear?
Yes. Ink must match the substrate and operating conditions. A code may look weak, spread, smear, or rub off if the ink is not suitable for the surface, drying time, humidity, temperature, or downstream handling.
Why does my TTO print look faint?
A faint TTO print may be caused by low heat, insufficient printhead pressure, incompatible ribbon, worn printhead elements, dirty printhead, or unstable film movement. Adjust heat carefully and check ribbon-film compatibility before increasing settings too much.
Why are some characters missing from the code?
Missing characters or dots often indicate a clogged nozzle, dirty cartridge, damaged printhead element, ribbon wrinkle, or printhead wear. Run a test pattern and check whether the missing area appears in the same position every time.
Why does the printed code smudge?
Smudging usually means the ink or ribbon has not bonded properly to the surface. Causes include wrong ink, insufficient drying time, wet or oily packaging, excessive TTO heat, downstream contact, or poor substrate compatibility.
How often should a coding machine printhead be cleaned?
Cleaning frequency depends on the printer type, ink, substrate, environment, and line conditions. Many lines benefit from a daily visual check and scheduled cleaning during startup or changeover. Follow the printer manufacturer’s cleaning procedure and avoid abrasive tools.
Why does my barcode print clearly but fail scanning?
A barcode can look acceptable to the eye but fail because of low contrast, missing quiet zones, distorted bars, incorrect size, poor resolution, or missing dots. Use barcode verification or at least a reliable scanner check during setup and production.
Should I increase print darkness to fix unclear print?
Not always. Increasing darkness, heat, or energy may help a faint code, but it can also cause bleeding, smearing, ribbon breakage, or faster printhead wear. First check cleaning, substrate compatibility, distance, pressure, and line stability.
When should the printhead be replaced?
Replace or service the printhead when cleaning no longer improves quality, test patterns show permanent missing dots, vertical lines remain in the same position, or the printhead surface is visibly damaged. Follow the maintenance guidance for the specific printer model.
When a coding machine print is not clear, avoid changing random settings first. Identify the symptom, check the printhead, confirm the printhead-to-product distance, inspect product movement, verify ink or ribbon compatibility, and test the code on the actual packaging material at real production speed.
In most packaging lines, unclear coding is not caused by one factor alone. It is often the result of printer condition, substrate behavior, mechanical stability, and setup control working together. A structured troubleshooting process helps reduce downtime, avoid repeated defects, and keep packaging codes readable throughout production.